As you may have noticed, we have introduced some significant changes to the TrafficJunky platform, bringing about better performance and effectiveness for your campaigns.
In this guide, we will be going through additions we made to the campaign, creating a flow to help you with your campaign’s automation and optimization. Before moving forward, here is what you will need to have to be able to follow along :
- A fully functional TrafficJunky account. If you do not have one, you can create one.
- Uploaded creatives on your Media Library. You can find more about that here.
- A basic understanding of HTML. You would only need this when implementing conversion trackers on your landing pages.
If you feel lost at any point in this tutorial, or things start to get unclear to you. Please feel free to reach out to your account manager or our customer support team for help.
Let us start then!
What are campaign optimization tools?
We have introduced some changes to the campaign creation flow to make it easier and more useful to create, automate, and optimize your campaigns. With these additional tools, you will be able to manage and optimize your campaigns in no time, and better yet, streamline the campaign creation flow so that you can focus on more important things.
Here are the benefits:
- Time-effectiveness. You will be able to create campaigns faster.
- Cost-effectiveness. You can control your spending in a more efficient way.
- Avoid diminishing returns. You can ensure that every ad that is showing to your user will not have a negative return. More on this later.
The tools that we will be covering in this tutorial are:
- The Bidder
- AutoPilot
- Rules Engine
Let us define what each one is before moving forward.
The Bidder
The bidder is a new feature added to allow you to set a target CPA (Cost Per Acquisition) for your campaign. It will also allow you to set a test budget per source. Think of the bidder as the way to define the caps for your campaign.
AutoPilot
The AutoPilot is your way of automating the way your campaigns run. With the autopilot, you will be able to let a potent and smart piece of code, aka an algorithm, do all the work for you while you think about scaling your campaigns.
Our algorithm will optimize the way your campaigns are running, ensuring you are reaching your goals without all the heavy lifting from your side. It is done through the optimization of your campaign’s ad weights. In short, this means that each ad will have a weight attributed to it, a weight that reflects how well this ad performs based on several factors. The better the performance, the higher the weight, the more chances this ad will be served if you win the bid. The opposite applies, as well. Our algorithm will manipulate said weights as your campaign runs to ensure that you are obtaining the optimal combination of ad rotation based on the optimized ad weights.
That is, there is no need to export data and spend much of your time looking at numbers trying to figure out the golden ratio. With this new feature, running campaigns will not feel like math homework anymore.
The Rules Engine
This tool will allow you to indicate to our algorithm what to do for a specific campaign. As everyone thinks differently, we wanted to offer you the opportunity to translate those brilliant ideas of yours into reality. The campaign rules are a set of logical steps that the algorithm will follow to ensure that your vision is being implemented in the exact way you want it.
The rules engine UI will allow you to create a rule for the algorithm to follow. A rule is your way of setting a condition to be checked against at a specific frequency of your choice and a task to be executed if the check on the condition returns true. To illustrate, let’s imagine we had an algorithm that sends you an update every time you are low on account funds. The rule you create for that would read, if my account funds are less than the funds necessary to run my campaigns, remind me to add funds. And do so daily. Since this algorithm acts on your campaigns, it will be slightly different. But the logic still stands. With the Rules Engine, you would be able to create rules that check against your eCPA, eCPM, revenue, and so on to execute a goal if the variable is greater, lower, or higher than the target you set. And you will be able to set a frequency according to which this check will happen, i.e., daily, weekly, or monthly.
The campaign rules can be cloned once created so that you can use them again at your convenience. This will allow you to save so the time when you are making your campaigns. You can also attach a rule to multiple campaigns if you are creating them in bulk. As for the Template, we will be defining them and adding them for you to use. This will depend on possible common scenarios. The latter will be helpful to you when you are optimizing your campaigns. In other terms, you can use either the rules or templates to indicate to the algorithm what to do when certain conditions are met. This, in turn, will help you avoid any surprises when you are checking your numbers to make sure that everything is running smoothly.
How is all this different from the legacy version?
In the legacy version, automation was not possible. You had to log into your account and make sure that the numbers you were seeing are to your liking. Else, you had to check your stats and optimize your campaigns yourself. This involved optimizing your bids, creatives, and the campaign itself. In the TJ DSP, automation could not come any more straightforward.
How do campaign optimization tools work?
Each optimization tool can work independently from the other, and they can also be performed together. You can use them all simultaneously without having any issues. However, some optimization tools need prerequisites to exist to use them. We will highlight these as we move forward. These prerequisites vary, but they are all simple to set up.
The AutoPilot
How does the AutoPilot work?
We know that the AutoPilot feature allows you to automate the way your campaign is running. Activating the AutoPilot ON will allow our algorithm to automatically adjust the rotation of the creatives associated with a campaign and the rate at which these creatives appear based on their performance.
The TrafficJunky algorithm will evaluate your creatives’ performance and, in doing so, optimizes the creatives clicked by the users. For the algorithm to do so, you need to have a data flow, a data flow that it can use to make its computations for the decision to happen.
At the start of this tutorial, we have mentioned that you need to be familiar with HTML. This is where that knowledge will come in handy.
What is a Conversion Tracker?
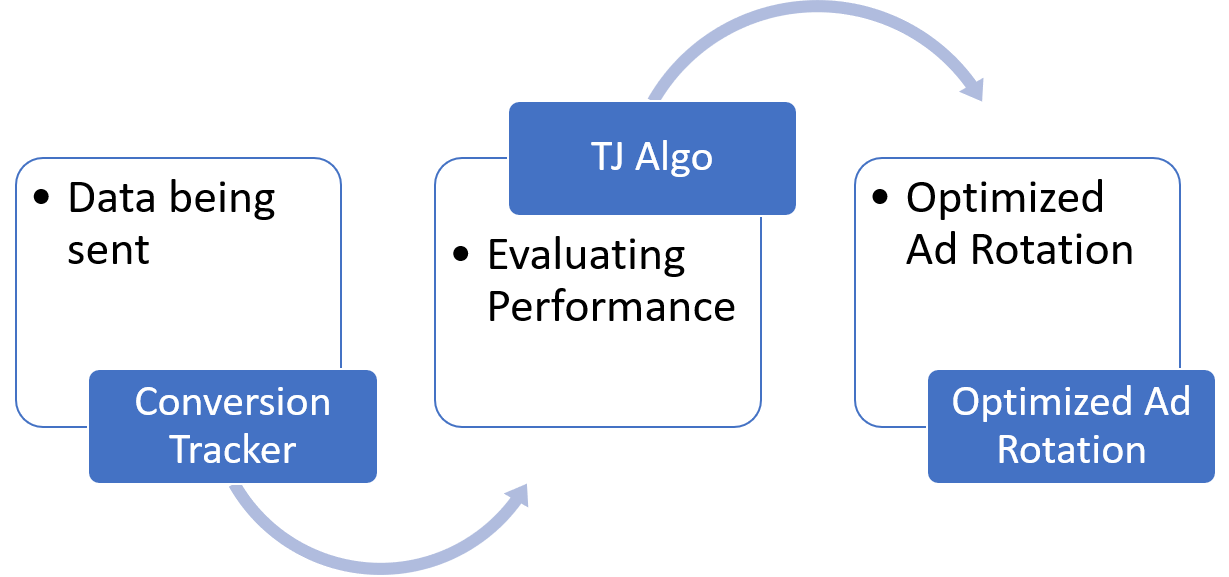
A conversion tracker is a pixel, or a snippet of code, used to share data between platforms. It is meant to connect the two platforms so; data can be sent and received without any issues.
This code will need to be inserted into the body of HTML. The body of your HTML page is whatever content is inside these two tags <body>…</body>. When you insert the conversion tracker into your landing page, data being “captured” by the conversion tracker will be sent to TrafficJunky so that the algorithm will be able to use it. Without the conversion tracker, you will not be able to use the AutoPilot feature if you ask yourself why the reason is simple. Every process needs a data flow that helps the main operation to be computed, measured, evaluated, or tested. Without that data flow, there is nothing that can be done. Here is a diagram that showcases this in a better way:
How do I create a conversion tracker?
Creating a conversion tracker is an effortless task. This can be done either from step 1 in your campaign creation or from the tools section. To create a conversion tracker, you would need to have these things ready:
- A name for your Conversion Tracker
- Event
There are more fields to fill, but these are the mandatory fields for creating a conversion tracker. It is worth noting that the value text field does not need to have value. Only do so if you have done prior calculations on your side as to, for instance, can quantify a lead or a view on Key Page.
After filling in all the information that you need, confirm the creation of your conversion tracker. If your conversion tracker has been successfully created, you will be able to see it in the list of conversion trackers. In the list, you will see a column entitled “Invocation Code.” This is where the HTML part comes in. You will be able to see two tabs being Postback URL and HTML Version. We will concern ourselves with the HTML Version. That code you are seeing is our pixel. All you need to do at this point is to take this piece of code and paste it into your landing pages to send back data on your campaigns and access it on your TrafficJunky campaign details.
It is also worth noting that you will be able to create several multiple conversion trackers for the same campaign and add them to your campaign’s landing page(s). You just must follow the exact instructions, as described above. However, we recommend you test the code snippet(s) to see if everything is triggering correctly to avoid any confusion in the future. If you do not know how to do that, contact your developer, and they will do this for you. Otherwise, please reach out to our team after you are done with your set up, and they will be able to help you out.
How do I set up my conversion tracker?
As we have discussed above, setting up a conversion tracker is a walk-in part, or it is supposed to be. All you have to do after creating your conversion tracker(s) is to copy the pixel code and insert it into your landing page(s) source code.
You can insert the pixel code inside your HTML body right after the opening body tag, which looks like this <body>. Or you can insert into the head of your HTML before the closing tag of your head, which looks like this </head>. Whatever the method you choose to go with, you need to test the pixel implementation before pushing the code live.
As a reminder, if the conversion tracker(s) are not embedded in your page, you will not track the performance of your campaigns. Make sure to embed them, and we will take care of that data syncing.
What are the benefits of using the AutoPilot feature?
Just like any other automation feature offered by any tool, multiple advantages come with a feature as powerful as the AutoPilot. Automation features allow you to gain a lot of time, which will be a significant advantage to you as an advertiser.
If you take all the manual work out of the equation, campaign creation will be easy, which means you can focus on strategic and creative work. If you can focus on creative and strategic work, you will be able to devise a robust roadmap to scale your campaigns and accelerate your growth. This is also applicable for your ad creatives; the better they are, the easier it is to compel the user(s) you are targeting. Also, do not forget about your landers. Not only would you be able to optimize them, but design new ones that go hand in hand with your new campaigns’ strategy. Time
But wait, there is more to it. Saving time has its advantages, but our feature, as mentioned, is more potent than this. As you already know what the AutoPilot automates and how it functions, you can guess where we are going next. If not, well, keep reading. The AutoPilot itself is an algorithm that ensures that a particular task is done; in our case, the optimization of ad rotations. But, why is this something to your advantage?
The answer to that comes in the lines that follow. The keyword we are looking at here is optimization. Let’s use the good old Oxford dictionary to define what optimization means. Oxford dictionary defines optimization as making the best or most effective use of a situation or resource.
For you nerdy folks out there, let’s spice things up with some technical terms that you make your day. When we talk about optimization, three terms ought to come to mind:
- Objective Function
- Constraints
- Maximization / Minimalization
Or if you want a higher-level term, operations research. As this tutorial’s goal does not align with offering an introduction to mathematical analysis, we will simply define what this means for you.
Operations research uses mathematical analysis for problem-solving. In our case, the “problem” we are trying to solve is an optimization problem. That is to say that we want to maximize your campaign performance through ad rotation with the applicable constraints. While you can do this manually, and by all means, if your math is as good as Richard Feynman, be our guest, you’d want something as reliable to do this for you, which is TrafficJunky’s AutoPilot. Let’s put things into perspective; you will have a very powerful algorithm maximizing your campaigns’ performance by finding the optimal set of combinations of ad rotations per source per campaign to create the highest value possible. In other terms, sign up and start creating campaigns. The algorithm will also find solutions that you if you are doing the work manually, might miss. The Bidder
The bidder is the second optimization tool that we will be looking at in this tutorial. If you have been following up to this point, you know what the bidder is designed to do. But, in this section, we will be diving deeper into this tool, so you can have a better understanding of how to use this tool to its full potential. So, what do we know so far about the bidder? Well, we know that we can use it to set a target CPA and a test budget per source. If you are just starting in the advertising industry, you should get familiar with CPA. If you are a veteran, then you already know what it means.
Understanding your Cost Per Acquisition (CPA)
What is a CPA?
CPA or Cost Per Acquisition is an indicator that informs you how expensive an acquired user is. In other terms, this indicator lets you know how much money you have spent to obtain a user.
How to calculate the Cost Per Acquisition?
The definition of the term offers insight into the mathematical formula we can use to calculate the CPA. As you might have guessed, the CPA is, indeed, average. And as we have hinted in the above section, this is an indicator that needs to be computed from the data. And, as any indicator, the way you calculate it will influence the way you understand your data.
Let us do some basic computation. If we know that the CPA is an indication of how expensive a user is, then we can mathematically translate this to:
CPA = 
If this is how you are currently calculating your CPA, then you would be correct, but not accurate. The above formula issue is a rough estimate based on the total cost of the media spent. An average is nothing more than estimation. It is not precise, and you should not be establishing any serious decisions on a mean. The upcoming part will be slightly technical, but it will highlight important points that will help you understand your CPA better. Let us jump right into it.
We will use the technical term for an average, which is the arithmetic mean. The arithmetic mean is subject to drastic change based on large x values. The larger your x values, the less accurate your average would be. Another problem with averages is that they are not fully representative. Mind you that we have said fully representative. In some cases, if you study a custom segment, you might find that their Cost of Acquisition is different than the one you obtained through an average.
We suggest that you segment your audience for a better representation of the CPA for more accurate results. If you are targeting multiple geographic locations, then your CPA should reflect the cost of acquisition per location so you can better understand your campaigns’ performance and how it reflects both on your expenses and your revenue, if applicable.
The same logic applies if you have multiple sources. You can study your CPA per source to understand the cost of doing business with various sources. This is very helpful as you can run a full audit and have a better breakdown of your advertising cost.
You can take this logic one step further and explore CPA per campaign aggregate channels. We highly recommend that you do not get too sucked in these calculations and forget the task at hand. You can also explore the median of your CPA. And while both the mean and median represents the middle, they do not do so similarly.
To recapitulate, the CPA is a statistic you can pull from your data, but very conscious of the number you obtain reflects and that it is representative of its audience.
How to set your target CPA?
Setting your target CPA is a critical task as it will affect, quite substantially, in some cases, the number of conversions you will be able to achieve if you set a CPA that is too low. You might be missing out on impressions that could lead to conversions. If you put a CPA that is too high, then you might be burning money too fast for your budget. Before we elaborate on the different points you can consider for setting a target CPA; it is essential to keep in mind that it is a dynamic value. It is not static. Understanding the trends of your CPA across different seasons, quarters, or whatever time interval you want to use is vital for your business’s advertising efforts.
The target CPA is the average amount of money you would like to pay for a conversion; we all got that part. But how do we set it? One way to do so is by using your historical conversion data. A straightforward way to do this would be to look at the trends of your CPA. This would allow you to know how much you should be willing to pay to acquire users. Please do not mistake the user value for the CPA. If you acquire a user at $80, it does not mean, not on any level, that the user will be worth $80 as to break even. If you want the said scenario to be true, then a series of computations need to be made to have a break-even model that takes its two main variables, the CPA and user value.
You should always take into consideration, however briefly, the opportunity cost of your target CPA per source or campaign. This can help you gain a better perspective and make better decisions.
If you are just starting and have no historical conversion data to help you out, then the good practice would be using forecasting to approximate to an nth degree of precision what your target CPA would be. As this is not a forecasting class, we recommend reading the exhaustive literature written on said subject. If you are having problems, you can always take your users’ average value and add a margin to it. This would be an excellent place to start.
Per Source Test Budget
What is a test budget?
You can think of the test budget as the initial stage to collect data for the algorithm to optimize your bids. If you are just starting, you would need to generate enough data so that the algorithm can have enough data points to work with. For this reason, we have created the test budget to help you do just that. The testing budget would be your default gateway into getting the right stats for the algorithm to optimize your campaigns optimally
How do I set my budget?
We recommend that you set your test budget to be higher than your target CPA. A general rule of thumb would be putting your test budget at 4 or 5 times your target CPA.
This is for the simple reason that with this ratio, you’d be able to generate enough data for our algorithm to optimize your campaigns. All this is to say that it will be tough for the algorithm to optimize your campaigns without a proper test budget. Otherwise, if you want to put a value that is not higher than your target CPA, please make sure to do your math to be convinced with what you are putting as a value.
Campaign Rules
As we have mentioned earlier in our guide, campaign rules are the way to control the algorithm’s execution to indicate what you want to include and exclude as you see fit. The idea behind campaign rules is to give you freedom over what you want the algorithm to behave like to take ownership of your campaigns and campaign-related Key Performance Indicators (KPIs). Campaign rules can also be used to automate the way you run your campaigns.
As mentioned at the start of the article, campaign rules are our way of allowing you to translate your thinking into logical rules that our algorithm can listen to customize its behavior according to your needs. Campaign rules are the way to bring about the custom configuration to our algorithm to serve you better.
How to create a campaign rule?
In the optimization step, below the bidder, you would see the “Rules” section where you would see a blue link that says “Create New Rules.” A window will pop up that would allow you to create the rule that you want. Even though they will enable you to create a logic to be followed by the algorithm, you are not sentences that you can write and be done with it. It is more sophisticated.
Rules Logic – Conditions
When you are creating a rule for your campaigns, you will have the ability to add conditions that will shape your campaign. Think of this as the set of logical steps that, if valid, the rule’s goal will be executed. If you have been using a computer for a while, you’d probably come across something called if…else statements. For you, tech-savvies, no explanation is needed on what that is.
Your campaign rules are, in fact, your if…else statement. In an if…else statement, you set the condition that the software, or code, will check its validity. If the check comes back correct, then one scenario is executed; else, another scenario will see the light of day. Here is a better way to visualize things:
if (campaign-rule == True) {
campaignGoal();
}
else {
keepAtIt();
}
Once you have created a rule to your liking, you will be able to clone it the next time you need it. That is pretty much it for the conditions. There are a variety of options to choose from when it comes to the creation of the condition. Everything is straightforward, however. We will not cover all the options, as it is a question of personal preference. But, the condition has three required fields that need to be set, being:
- When: reflecting the variable of interest
- Is: reflecting a condition
- Amount: reflecting a number to check against
Campaign Rules – Occurrence
As its name suggests, this section of the rule creation will allow you to define how frequent the rule will apply. In other words, how often should your rule be checked against to change the behavior of the algorithm. You can set the interval to different values being:
- Hourly
- Daily
- Weekly
- Monthly
You can also choose which data should the rule be checked against; we recommend that the historical data match the time interval for more accuracy. But, if you know there is value in having different periods, you can give it a go. As always, please make sure that your decisions are well informed, and ideally, data-driven.
Rule Goals
Now, we come to the execution side of the campaign rules. In that small piece of code we have shown, the campaign goal will be executed if the rule you have set is correct. As it stands, the goal is the exclusion of a source if the campaign rule is valid. As a heads up, if a rule is valid, that means the condition that you have set came to pass. If it is false, then the condition did not come to pass.
Please keep in mind that the frequency will also take part in this whole equation. This means that the frequency you set your rule to be checked against will also determine how frequently the campaign goal will be executed. Please keep in mind that this does not mean that the campaign goal will necessarily be executed. It just means that it could be; it is a possibility.
Choose from template – Automate & Optimize
As mentioned above, once the campaign rule you have created has been saved, you will be able to re-use it either by cloning it or attaching it to multiple campaigns. This will help you automate your campaigns by applying the same logic in bulk. This will also make it easier for you to predict and align your expectations for the different campaigns you are running. You can also use the template feature where you can select curated templates from us. These templates will be built around possible common scenarios that we think would be applicable.
Templates are ready-to-use rules designed to address all possible frameworks applicable to any advertiser. For instance, low impressions, low conversions, high conversions, and other frameworks will be predefined for you to use. Templates follow the same principles and logic of rules. In other terms, it is logical steps to query the algorithm of what should be done. As mentioned, this is like the rules that you will be defined with the slight difference of predefined rules and values.
Opting for a template will automatically fill the text fields with values. The text fields are the same for the rules, i.e., when is, amount, how often, and data from. For instance, you can read the template rules as follows: if in the last 15 days, the ROI is equal to 0$, then exclude source and repeat this monthly.
A recommended way to use the campaign rules is to create rules that you know will be used for specific campaigns to repeatedly avoid doing the same thing, especially if you are building campaigns in bulk.
Campaign rules can automate the campaign creation thanks to the template functionality or attaching rules to multiple campaigns. Still, it can also help you with the optimization of your campaigns. If you are keeping a good record of your data for your respective campaigns and then finding out how to troubleshoot a specific issue, you can create a rule for it so that the campaign is optimized through the rule. This will also keep your solution saved in the system if you ever lose it. This way, you have covered all around, and all that is left for you is to scale up your campaigns and achieve your business goals.
An important note to keep in mind is that once you have created a rule, you will not modify its logic.
Well, that’s it. We are at the end of our tutorial. To reiterate, if you have any problems, feel free to reach out to your account manager or us, and they will help solve all the issues you are having. If you lose focus and have problems following up with a particular section, we are one message or call away.
Happy Advertising!