TrafficJunky is excited to announce a refreshed structure to create campaigns. This new flow will make creating campaigns a breeze!
Jump on this opportunity to place your brand in front of 3.7 Billion daily network ad impressions and create dynamic, potentially profitable campaigns today.
It’s never been easier to make your campaigns go live, thanks to a strategic restructuring of the campaign creation process.
Watch this video for a Quick Walk-through on how to create a TrafficJunky Ad campaign or keep reading to understand the new flow and find relevant resources.
Before starting the Campaign Creation Process
Create a Campaign on TrafficJunky (Step-by-Step walkthrough)
Before starting the Campaign Creation Process
Want to ensure your campaign runs smoothly after it has been created? Complete these three steps:
- Add your creatives to the Media Library before creating your campaign. Doing so increases the chances of your creative being approved when you’re ready for your campaign to go live. In addition, it gives you time to make any necessary adjustments.
– Click here for a guide on how to add creatives to the media library.
– Click here to browse our ad formats page to see the available ad types and the devices on which they can be served. - Fill out your profile with all the requested information.
- Complete the YOTI Verification. This verification makes sure your account is in compliance with TrafficJunky policies and unlocks access to account payment methods.
Guide: ID Verification
Step-by-Step Walkthrough of Campaign Creation on TrafficJunky
Step 1: Basic Settings – Choose Your Campaign Settings
Step 2: Audience – Target Your Audience
Step 3: Tracking, Ad Spots, & Rules – Track Your Campaign, Choose & Optimize Your Sources
Step 4: Schedule and Budget – Set Your Campaign Schedule and Budget
Step 5: Ad(s) – Create Your Ad(s)
Step 1: Basic Settings – Choose Your Campaign Settings

This first step towards creating your campaign is crucial.
While the only required element of this step is the Campaign Name, we highly encourage you to complete all of the fields. In other words, think of it as a planning exercise. Defining these Basic Settings will save you time and energy as it will inform the rest of your campaign creation process.
Campaign Name (required): As you develop your campaign portfolio, consider establishing a naming convention. Doing so will allow you to quickly review your campaign information and performance on your dashboard quickly.
Group: Organize your campaigns by grouping them just as you would with folders on your computer.
Labels: Find related campaigns faster by tagging them with up to six labels.
Device: Select the device you want your ads to be displayed on. Consider your target audience and determine whether they primarily consume content on Desktop or Mobile/Tablet.
Ad Format: Click here to browse through the ad formats and specifications we offer.
Step 2: Audience – Target Your Audience

Here, your campaign begins to take identity – Who is your target audience? Where are they located? What is the best way to reach them?
Geo-Targeting: Consider the physical location of your audience. For every campaign, only one country can be targeted. However, you can target up to 10 regions or cities within the chosen country.
Feature: Location Targeting Feature for Audience Segmentation
Guide: Geo-Targeting with TrafficJunky’s Geotargeting Features
Opt to use our offered targeting features. Don’t just meet your audience where they are, speak their language and reach them on their choice of devices.
Zip/Postal Code Targeting: Select up to 100 postal code(s) you want to target. You may only target zip codes within the United States, Canada, and Japan.
Feature: Location Targeting Feature for Audience Segmentation
Income & Population Targeting: Drive effective targeting campaigns through this more granular targeting option that leverages income and neighborhood statistics. This targeting option is only available when targeting the United States.
ISP Targeting: This targeting is based on the user’s Internet Service Provider (ISP).
Mobile Connection Targeting: This lets you focus on users who are browsing content while connected to Wi-Fi or streaming using their Internet Service Provider (ISP).
OS Targeting: This lets you target audiences based on their operation systems.
Browser Targeting: This method targets the specific browser(s) users consume content on. By default, all browsers are selected.
Note: Uncheck the Chrome browser if your creatives fail Google Better Ads compliance rules.
Browser Language Targeting: Target or exclude up to 5 browser languages.
Advanced Targeting allows you to leverage your website user engagement data and our network data to make informed advertising decisions.
Keyword Targeting: Assess the relevance and search volume of keywords on our publisher sites and select the most relevant ones for your audience. This will allow you to serve your ad along the broad or exact matches of the keywords of interest.
Audience Exclusion Pixel Targeting & Retargeting: Stretch your budget by excluding audiences who have already converted for your offer. Reallocate these savings to reengage potential customers who have already interacted with your website through our Retargeting Feature.
Segment Targeting is useful for reaching users who have interacted with your niche on our publisher sites. Use the niche interests to understand the volume of this audience and set your campaign to target them exclusively.
Note: If using Infinity Tags, your custom domains will also show under this feature.
Guide: Retargeting Using Infinity Tags & Segment Targeting
Step 3: Tracking, Sources & Rules – Track Your Campaign, Choose & Optimize Your Sources
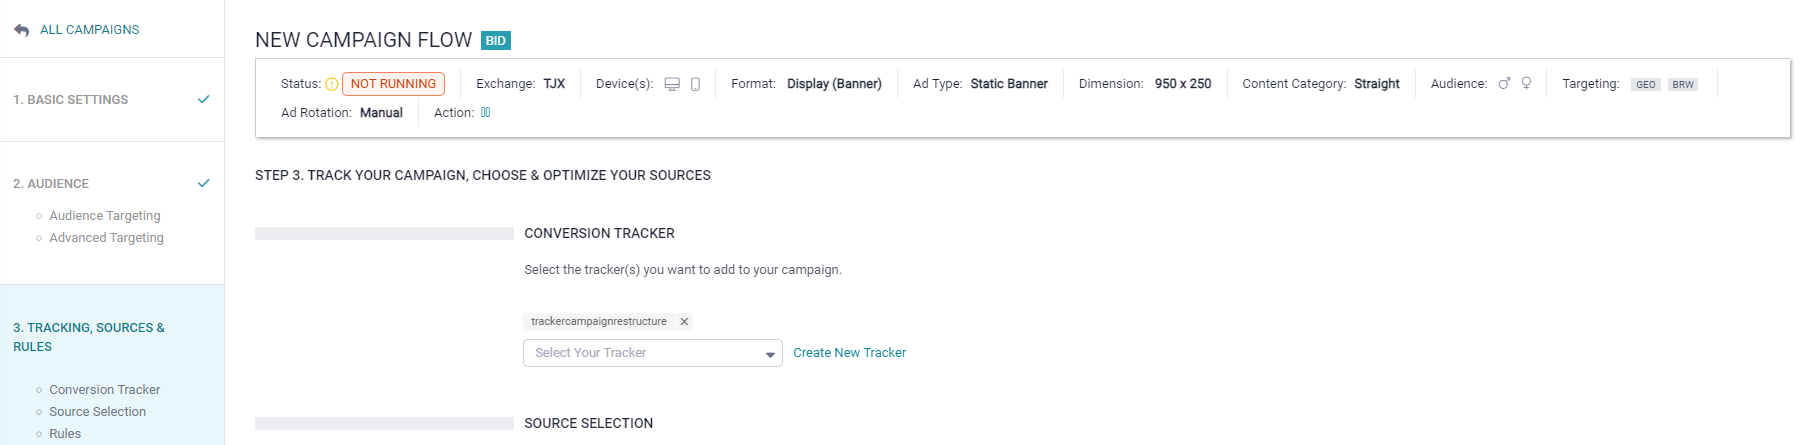
By default, your campaign’s targeted sources and bids are set as follows:
- Your campaign targets all available sources.
- Bids are automated, set, and updated based on market values.
Alternatively, you can manually select specific sources. When doing so, you can either automate your CPMs or edit them manually.
Note: If editing your bids manually, keep an eye on our suggested CPMs.
Conversion Trackers help you assess the performance of your campaigns by seeing the conversion results. Click “Create a New Tracker” or use one already created.
How To: Track Conversions Using TrafficJunky
Source Selection: The default setting, Automatically (All), means your campaign targets all sources. Switch the setting to Manually to select specific sources for your campaign.
Source Bidding: The default setting, Smart CPM, automatically adjusts your bid as per market value. This bidding is available for both automatic and manual source selection. In contrast, use the Bidder to reach your CPA goals. Set a Max Bid, which is the highest bid value you are willing to spend on a source.
Note: A conversion tracker is needed to use the Bidder feature. There is no max bid option if you manually select sources without automating your bids.
Rules for Source Optimization: Optimize your campaign to exclude underperforming sources or those already meeting your campaign goals.
Step 4: Schedule & Budget – Set Your Campaign Schedule & Budget
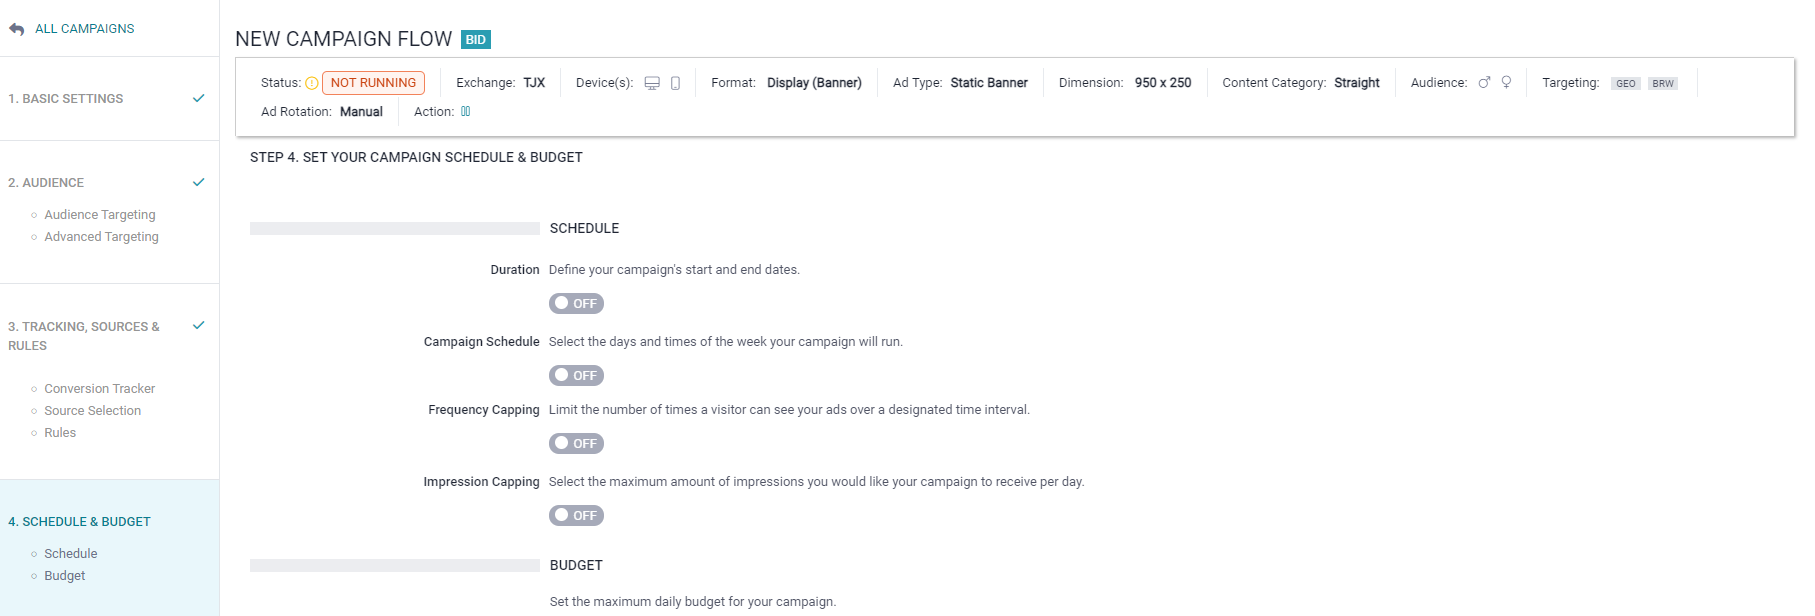
Control your budget by determining when your campaigns are live on the TrafficJunky network.
Duration: Define the start and end date of your campaign. Keep in mind the time is in Eastern Standard Time (EST). You can also add up to 20 date and time ranges.
Campaign Schedule: Select specific days and times to run your ad (EST).
Frequency Capping: Limit the number of times a user will see your campaign over a designated time. This feature helps to prevent users from getting ad fatigue and ensures your ad is served to potential new customers.
Budget: Define the maximum daily budget you’re comfortable with. The minimum daily budget can’t be set below $25 by default.
Step 5: Ad(s) – Create Your Ad(s)
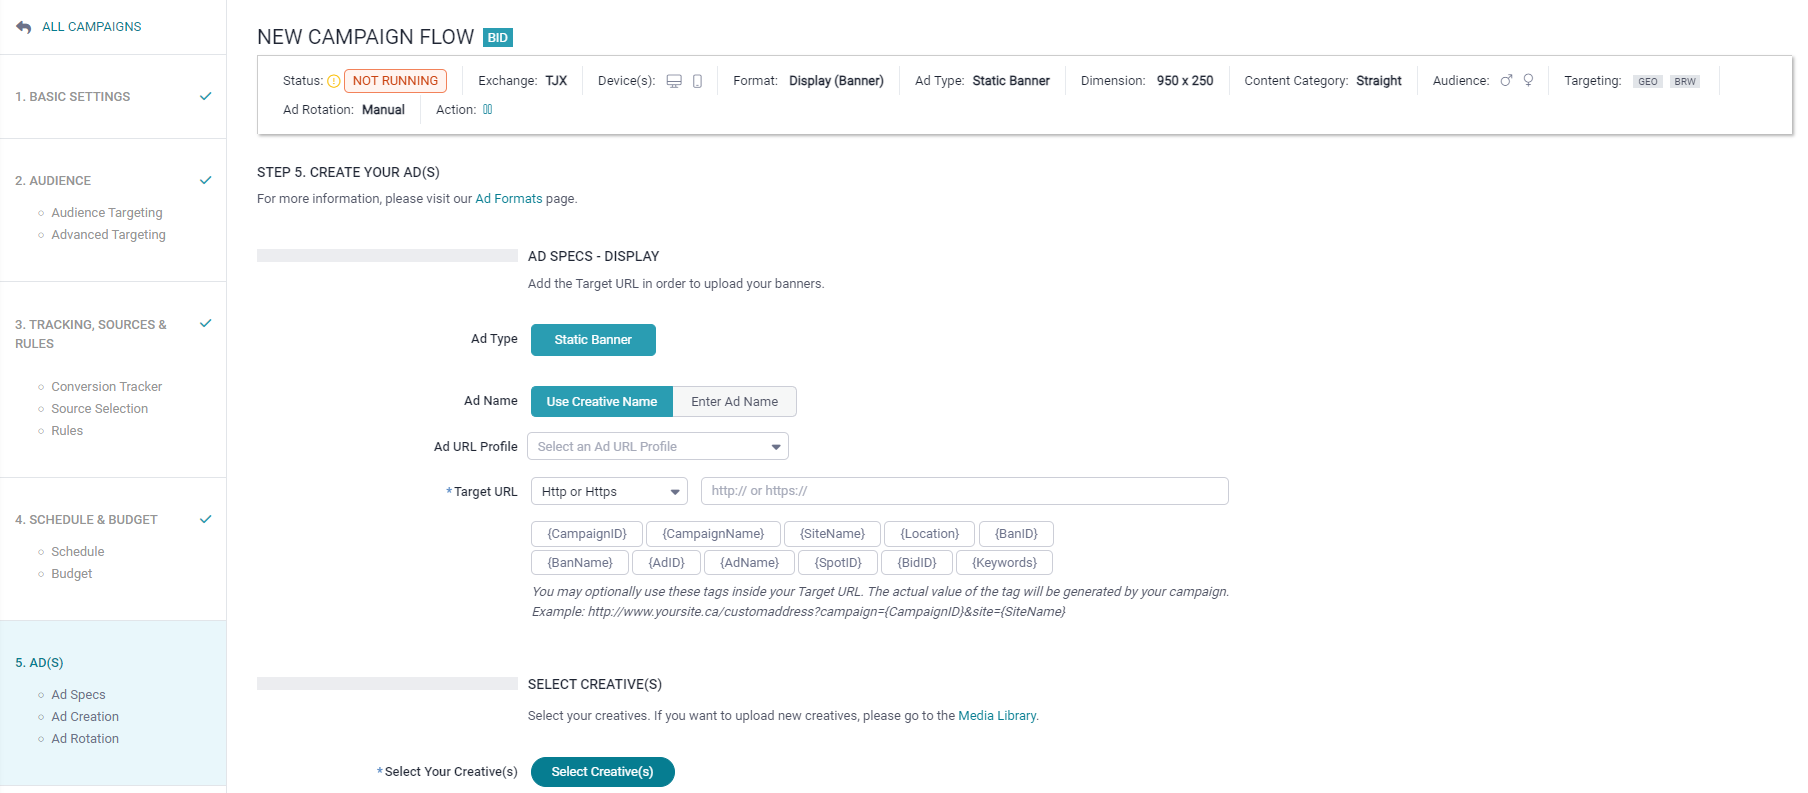
Now, let’s move on to the fun part of the campaign creation process….
Finally, turn your creatives into dynamic ads.
Ad Specs: Name your ad, either by your choice or the creative’s file name, and define your target URL.
Select Creatives: Add life to your ad by selecting the approved creative for the ad format and dimensions you defined in Step 1. After confirming your selection, you will see a summary of all the creatives added to the campaign.
Guide: How to Upload Creatives in the Campaign Manager
Creative Rejection: Google Standard Fail
TrafficJunky’s Animation Rules Explained
Guide: TrafficJunky’s Most Common Banner Rejection Reasons
Ad Rotation for Ad(s) Optimization: By default, all creatives are served evenly across selected sources in your campaign. You can adjust the ad weightage manually based on performance. Alternatively, for a hands-off approach, use the Autopilot feature to display your highest-performing ads.
Note: A conversion tracker is required for Autopilot.
Guide: Select Your Sources and Adjust Your Ad Rotation
We can’t wait for you to try our new campaign creation flow, Sign in to your TJ account now!!
As always, the TrafficJunky Team is here to assist you with any questions, comments, or concerns.
Contact support@trafficjunky.com or your Account Manager for any further queries!